
So you’ve finally decided to take your electric guitar skills to the next level and start recording your own music. Whether you’re an aspiring rock star or simply want to document your guitar-playing journey, this article will guide you through the process of recording electric guitar. From setting up your equipment to fine-tuning your sound, we’ll cover all the essentials to help you capture your best guitar performances and create professional-quality recordings at home. Let’s get started!

This image is property of cdn.mos.cms.futurecdn.net.
Choosing the Right Equipment
Selecting the Guitar
When it comes to recording electric guitar, choosing the right instrument is crucial. Consider the style of music you’ll be playing and the sound you want to achieve. Different guitars have distinct tonal characteristics, so it’s important to find one that suits your preferences. Do you prefer a bright and twangy sound or a warm and rich tone? Take into account factors such as body shape, pickups, and the guitar’s overall construction. Don’t be afraid to test out different guitars to find the one that feels and sounds right for you.
Choosing the Amplifier
The amplifier you choose will have a significant impact on the tone of your recorded guitar. There are various types of amplifiers, such as tube amps, solid-state amps, and digital modeling amps. Each type has its own unique characteristics, so it’s essential to consider the sound you want to achieve. Tube amps are known for their warm and organic tones, while solid-state amps offer a more reliable and consistent sound. Digital modeling amps provide a wide range of tones and effects, making them versatile options. Consider your budget, playing style, and tone preferences when selecting an amplifier.
Deciding on the Right Microphone
Choosing the right microphone is crucial for capturing the sound of your guitar accurately. Different microphones have different frequency responses, polar patterns, and sensitivities. Dynamic microphones are commonly used for recording electric guitars due to their durability and ability to handle high sound pressure levels. Condenser microphones, on the other hand, offer a more detailed and transparent sound. Experiment with different microphones to find the one that captures the sound of your guitar in the desired way.
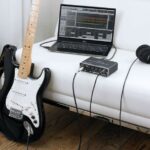
Selecting an Audio Interface
An audio interface is the bridge between your guitar, amplifier, and computer. It’s responsible for converting the analog signal from your amp into a digital format that can be recorded on your computer. When choosing an audio interface, consider factors such as the number of inputs and outputs you need, the sample rate and bit depth, and the compatibility with your recording software. Look for an interface that offers low latency, high-quality preamps, and reliable connectivity. Investing in a good audio interface will ensure that your recordings sound professional and accurate.
Setting Up Your Recording Space
Choosing a Suitable Room
The room in which you record your electric guitar can greatly impact the sound quality. Ideally, choose a room that is acoustically treated or has minimal interference from outside noise. Avoid small, boxy rooms that can create unwanted reflections and resonance. Consider the size of the room as well; larger rooms tend to offer a more spacious and natural sound. If possible, set up your recording space in a room with minimal background noise and good natural acoustics.
Dealing with Acoustic Issues
Even if you don’t have a professionally treated recording space, there are steps you can take to mitigate any acoustic issues. Use thick curtains, rugs, and furniture to absorb reflections and reduce reverb. Place bass traps in the corners of the room to control low-frequency buildup. If the room still has excessive reverb, consider using portable acoustic panels or blankets to create a more controlled environment. Additionally, experimenting with microphone placement can help minimize any negative acoustic effects.
Positioning the Guitar and Amplifier
When setting up your recording space, consider the positioning of your guitar and amplifier. Place the guitar stand or guitar hanger in a convenient spot where you can easily access your instrument. Ensure that the amplifier is positioned at a suitable distance from both you and the microphone to achieve a balanced sound. Experiment with different positions to find the sweet spot where the guitar and amp interact harmoniously.
Setting up the Microphone
Proper microphone placement is essential for capturing the true sound of your guitar and amplifier. Experiment with different microphone positions to achieve the desired balance between the guitar’s direct sound, room ambiance, and amplifier tone. Start by placing the microphone directly in front of the guitar speaker cone, slightly off-center. Adjust the distance from the speaker to find the optimal balance between brightness and warmth. Don’t be afraid to move the microphone around and try different angles to find the best sound for your recording.
Preparing the Guitar and Amplifier
Checking and Replacing Strings
Before recording your electric guitar, it’s crucial to ensure that your strings are in good condition. Old and worn-out strings can negatively affect the tone and intonation of your instrument. Make it a habit to regularly check your strings for any signs of wear, such as rust, fraying, or discoloration. Replace strings that are past their prime to ensure that your recordings have a clear and vibrant sound.
Setting the Guitar’s Action
The action of your guitar refers to the distance between the strings and the fretboard. Proper action is crucial for achieving good playability and intonation. High action can make it harder to play and can result in poor intonation, while low action can cause buzzing and fretting out. Use the adjustable bridge and truss rod to fine-tune the action of your guitar. Experiment to find the ideal action that allows for comfortable playing without sacrificing tone.
Adjusting the Pickup Height
The height of your guitar’s pickups can greatly affect the sound and output level. Experiment with the pickup height to find the sweet spot where the tone is balanced and the output is consistent. Higher pickup height can result in a brighter and more articulate tone, while lower pickup height can create a warmer and smoother sound. Fine-tune the pickup height until you achieve the desired tone and response.
Tuning the Amplifier
Just like tuning your guitar, it’s important to ensure that your amplifier is properly tuned. Use the tone controls on the amp and any built-in digital settings to adjust the amp’s sound to your liking. Experiment with different settings to find a balanced tone that complements your guitar and playing style. Don’t be afraid to spend some time dialing in the perfect sound before recording.
Setting the Right Tone
Using the Guitar’s Controls
Most electric guitars come with various controls, such as volume and tone knobs, as well as pickup selectors. These controls offer a versatile range of tones and timbres. Experiment with the guitar’s controls to find the sweet spot that suits your playing style and the desired sound for your recording. Adjusting the volume and tone knobs can help you achieve different shades of brightness and warmth, while switching between pickups can offer various sonic options.
Utilizing Effects Pedals
Effects pedals can greatly enhance the sound of your recorded guitar. From classic reverb and delay to more adventurous effects like distortion and modulation, a wide array of pedals are available to shape your tone. Experiment with different pedals to find the ones that best complement your playing style and the genre of music you’re recording. Remember to use effects tastefully and sparingly, as excessive use can clutter the mix and distract from the essence of your playing.
Adjusting the Amplifier’s EQ
The EQ controls on your amplifier allow you to shape the tone of your recorded guitar. Experiment with the bass, mid, and treble controls to find a balanced sound that suits your taste. Avoid extreme settings that can result in an unnatural or muddy tone. Instead, make subtle adjustments to highlight or cut certain frequencies to achieve a well-rounded and pleasing sound. Remember that the EQ settings may need to be adjusted depending on the specific song or recording.
Experimenting with Various Tones
Recording electric guitar offers an opportunity to explore various tones and textures. Don’t be afraid to experiment with different combinations of guitars, amplifiers, effects, and settings. Try out different pickups, adjust the pickup selector, and even experiment with unconventional mic placements. Recording is a creative process, and exploring different tones can help you discover unique sounds that capture the essence of your playing.

This image is property of i.ytimg.com.
Recording Techniques
Using Direct Recording
Direct recording involves capturing the sound of your guitar directly into your audio interface without the use of an amplifier. This approach is commonly used in home recording setups and offers a clean and accurate representation of the guitar’s tone. To achieve a good direct sound, connect your guitar directly to the audio interface using a high-quality instrument cable. Use amp simulation plugins or software to replicate the sound of a guitar amplifier in your recording software.
Miking the Amplifier
Miking the amplifier involves placing a microphone in front of the speaker to capture the sound of the guitar and the amplifier’s characteristics. Experiment with different microphone types and positions to find the sound that best suits your recording. Dynamic microphones are commonly used for miking guitar amps due to their ability to handle high sound pressure levels and capture the punch and energy of the sound. Position the microphone close to the speaker for a brighter and more focused sound, or move it further away for a more natural and roomy tone.
Combining Direct and Mic Recording
A common recording technique is to combine the direct recording of the guitar with the miked sound of the amplifier. This technique offers the best of both worlds, allowing you to capture the clean and precise sound of the direct signal while also incorporating the unique character and tone of the amplifier. This can be achieved by blending the direct signal and the miked signal in your recording software or using a mixer. Experiment with different blending ratios to find the perfect balance for your recording.
Using Multiple Microphones
For more advanced recording setups, using multiple microphones can provide a wider range of tonal options and capture the full spectrum of your guitar’s sound. Experiment with different microphone positions and combinations to find interesting textures and stereo imaging. Place one microphone close to the speaker for a focused sound, and another microphone further away for room ambiance. Utilizing different microphones can help you achieve a more immersive and dynamic recording.
Monitoring and Playback
Using Studio Monitors or Headphones
When recording electric guitar, it’s important to use accurate monitoring systems to ensure that you can hear every nuance of your playing. Studio monitors or high-quality headphones are recommended for critical listening. Studio monitors provide a flat and transparent frequency response, allowing you to hear the sound accurately, while headphones offer an isolated and detailed listening experience. Invest in a good pair of studio monitors or headphones that suit your preferences and provide an accurate representation of your recordings.
Setting Proper Levels
Proper level setting is crucial for achieving a balanced and professional-sounding mix. Avoid recording too hot, as it can result in clipping and distortion. Start with conservative input levels and adjust them during the recording process to ensure that your recordings stay clean and free of unwanted artifacts. Pay attention to peak levels and avoid excessive volume that can affect the dynamics and clarity of your recordings. Keep your levels in check during both recording and playback to ensure a consistent and pleasant listening experience.
Utilizing Monitor Mixes
When recording, it’s important to be able to hear a balanced mix of your guitar, the backing track, and any other instruments you may be recording alongside. Utilize monitor mixes to achieve the proper balance. In your recording software or audio interface, set up separate headphone mixes or monitor mixes that allow you to control the individual levels of each track. This way, you can adjust the levels to your liking and focus on your guitar playing without being overwhelmed by the other instruments.
Monitoring During Recording and Playback
During the recording process, it’s important to constantly monitor your sound to ensure that you’re capturing the desired tone and performance. Listen carefully for any unwanted noises, extraneous vibrations, or technical issues that may affect the quality of your recordings. Take breaks and listen to your recordings with fresh ears to evaluate the overall sound and make any necessary adjustments. Pay attention to the dynamics, tone, and overall balance to ensure that your recordings sound professional and polished.

This image is property of d2pucgucjvdva3.cloudfront.net.
Recording Tips
Start with a Soundcheck
Before diving into recording, take some time to do a thorough soundcheck. Set up all your equipment, ensure that everything is working properly, and spend some time dialing in the tone you want to achieve. Test out different settings, experiment with microphone placements, and make any necessary adjustments to your guitar, amplifier, and recording setup. Starting with a solid soundcheck will save you time and frustration during the recording process.
Warm Up Before Recording
Just like any other physical activity, warming up is essential before recording your electric guitar. Spend a few minutes stretching your fingers and wrists to avoid unnecessary tension or strain. Play through some scales or exercises to get your fingers moving and your mind focused. Warming up will not only improve your playing technique but also help you perform at your best during the recording session.
Avoid Overplaying
When recording, it’s important to consider the context and purpose of the recording. Sometimes, less is more. Avoid overplaying or adding excessive fills and licks that can distract from the overall musicality of the recording. Focus on playing with intention, precision, and emotion. Pay attention to dynamics, timing, and phrasing to create a compelling and musical performance.
Capture Different Takes
Recording multiple takes of your guitar parts can provide options during the editing and mixing process. Don’t be afraid to experiment with different approaches, tempos, and dynamics. Sometimes, the first take captures the magic, but other times, subsequent takes may offer a fresh perspective or unexpected nuances. Give yourself the flexibility to choose the best performances during the editing process by capturing multiple takes.
Post-Recording Processing
Editing and Arranging Tracks
Once you have recorded your guitar parts, it’s time to edit and arrange the tracks. Use your recording software to trim any unwanted parts, tighten up the timing, and create a cohesive structure. Pay attention to transitions, fades, and any crossfades between different sections. Arrange your tracks in a logical order to ensure a smooth and enjoyable listening experience.
Cleaning up Background Noise
During the recording process, it’s common to encounter background noise, such as hiss, hum, or room ambiance. Use noise reduction plugins or software tools to clean up any unwanted noise. Apply gentle noise reduction techniques to preserve the natural character of your guitar sound while minimizing any distractions. Be careful not to overdo it, as excessive noise reduction can result in unnatural artifacts.
Adding Effects and Equalization
After recording your guitar parts, you may want to enhance the sound with additional effects and equalization. Use your recording software to add reverb, delay, modulation, or any other effects that complement the style and mood of your music. Experiment with different settings and intensities to find the right balance. Additionally, use equalization to shape the frequency response of your guitar tracks. Cut or boost specific frequencies to enhance clarity, presence, or warmth.
Mixing the Tracks
Mixing is the process of balancing and blending all the recorded tracks to create a cohesive and polished final mix. Use your recording software to adjust the volume, panning, and equalization of each track to achieve a balanced and pleasing sound. Pay attention to the relationship between different instruments and make any necessary adjustments to ensure that the guitar sits well in the mix. Experiment with different effects and processing techniques to add depth and dimension to your recordings.

This image is property of guitarpickzone.com.
Saving and Exporting Your Recording
Choosing the Right File Format
When exporting your recordings, it’s important to choose the appropriate file format. Consider the intended use of your recordings and the compatibility with different platforms. For general distribution, commonly used formats such as WAV or MP3 are suitable. For higher quality and uncompressed recordings, consider using formats like FLAC or AIFF. Ensure that the file format you choose is compatible with the devices and software you’ll be using for playback.
Setting Appropriate Levels for Export
Before exporting your recording, ensure that the levels are properly set. Avoid clipping or clipping distortion by reducing the overall volume if necessary. Aim for a balanced and consistent level throughout the recording to ensure that the final mix translates well across different listening systems. Make any final adjustments to the volume, panning, and overall balance to achieve the desired sound.
Bouncing Down the Final Mix
Once you have finished mixing your recordings, it’s time to bounce down the final mix. This process involves consolidating all the individual tracks into a single stereo file. Bounce down your mix in the appropriate file format and sample rate, ensuring that all the settings are correctly set. Double-check for any potential issues or errors before finalizing the bounce. Save your final mix in a designated folder to keep your project organized.
Backing up your Project
After completing your recording project, it’s crucial to back up your work to prevent any potential loss of data. Create multiple copies of your recordings and store them in separate locations to ensure their safety. Use external hard drives, cloud storage, or other backup solutions to safeguard your recordings. Remember to periodically update your backups to include any new recordings or changes to your project.
Troubleshooting Common Issues
Dealing with Noise and Hum
If you encounter unwanted noise or hum in your recordings, there are several steps you can take to address the issue. Check for ground loops or electrical interference that may be causing the noise. Ensure that all cables are properly connected and shielded to minimize interference. Use noise reduction plugins or software tools to remove any persistent noise during the post-recording processing stage. Experiment with different recording setups or positioning to reduce noise and hum.
Solving Phase Issues
Phase issues can occur when recording electric guitar with multiple microphones or when combining direct and miked signals. If you notice phase cancellation or comb filtering, adjust the microphone placements or experiment with different phase alignment techniques. Utilize your recording software’s phase inversion tool to check for any phase cancellation issues and correct them if necessary. Pay attention to the phase relationship between the different tracks to ensure that all elements are in phase and working together harmoniously.
Eliminating Ground Loops
Ground loops can be a common issue when recording electric guitar, resulting in humming or buzzing sounds. To eliminate ground loops, try using balanced cables, which are less susceptible to interference. If using unbalanced cables, ensure that all your equipment is properly grounded and that you’re using the appropriate power outlets or surge protectors. Consider using ground loop isolators or hum eliminators to further mitigate any ground loop issues.
Addressing Recording Artifacts
Recording artifacts, such as clicks, pops, or distortion, can sometimes occur during the recording process. To address these issues, ensure that all your recording equipment is functioning properly and that all connections are secure. Use quality cables and check for any potential interference sources, both within your recording setup and in the surrounding environment. During the post-recording processing, utilize audio editing tools to remove any unwanted artifacts and restore the integrity of your recordings.
In conclusion, recording electric guitar involves a combination of careful equipment selection, thoughtful setup, and meticulous attention to detail. By choosing the right guitar, amplifier, microphone, and audio interface, and properly setting up your recording space, you can lay the foundation for capturing high-quality recordings. Paying attention to factors such as string condition, action, and pickup height ensures that your instrument is in optimal playing condition. Experiment with different tones, recording techniques, and monitor mixes to find the sound that best suits your musical vision. Lastly, when it comes to troubleshooting, be prepared to address common issues such as noise, phase problems, ground loops, and recording artifacts. With patience, practice, and the right techniques, you can achieve professional-quality recordings of your electric guitar.

This image is property of guitar.com.


About the Author

Michael-B is a Music Producer, Musician, and Formally Trained (and was Certified by the Recording Institute of Detroit in 1986) Recording Engineer. As of to date, He's built 3 home recording studios go back to 1987, where he wrote, played all the instruments, and recorded his music. Michael B is also a Writer, Chief Editor and SEO of TrackinSolo.com